# API Integration Guide
This guide describes the recommended steps to integrate with the Fluxis API, from credential provisioning to transaction reconciliation.
## Integration overview
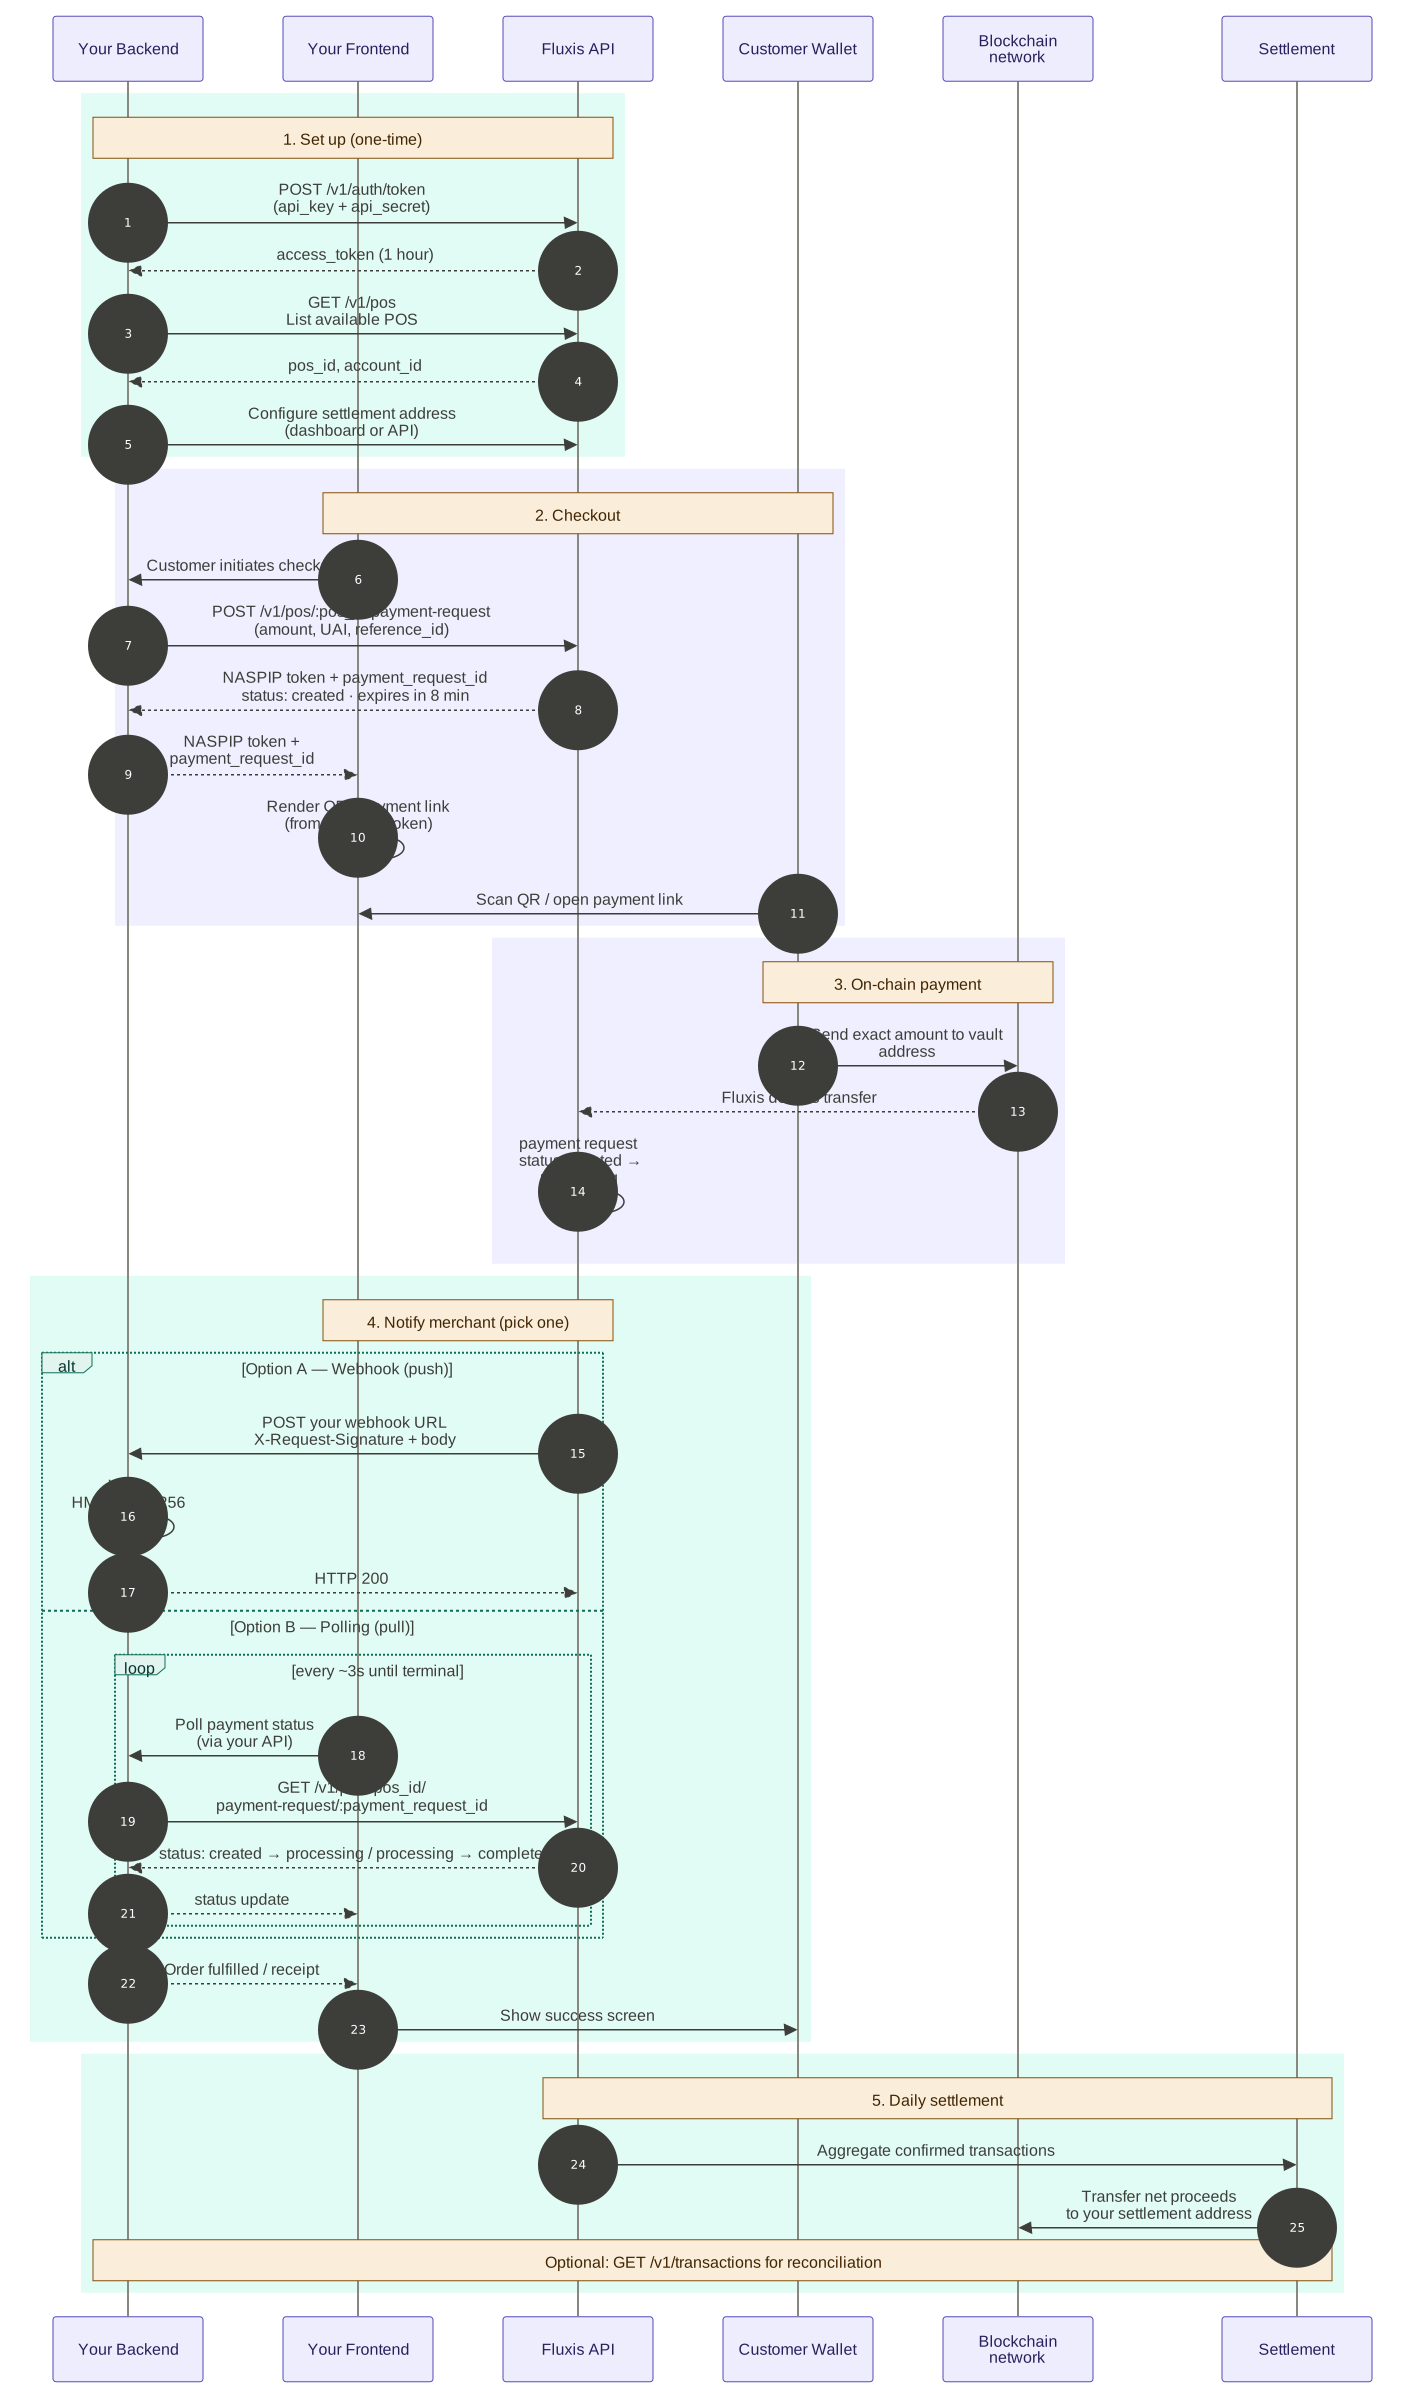
A typical Fluxis integration follows these steps:
1. **Credential provisioning** — Create an API key in the dashboard (read + write roles)
2. **Authentication** — Exchange credentials for a Bearer access token
3. **Resource discovery** — Retrieve your default accounts and default points of sale (the ones created when you signed up)
4. **Create your online POS** — Set up your POS for online payments, so it can generate multiple payment requests in parallel
5. **Settlement configuration** — Configure the crypto address where collected assets will be delivered. You can do this in the dashboard or via the API.
6. **Payment request creation** — Create a payment request for each checkout attempt
7. **Monitor payment status** — [Webhooks](/docs/developers/webhook-events) (push) or polling (pull)—pick one or both
8. **Reconciliation** — Periodically query transactions to catch missed events
## Before you start
### Environments
| Environment | Host |
| ----------- | -------------------------- |
| Staging | `https://api.stgfluxis.us` |
| Production | `https://api.fluxis.us` |
::::note
Production credentials will be generated after your staging integration is complete and approved by Fluxis.
::::
### Required headers
All protected Fluxis endpoints require **both** headers:
- `Authorization: Bearer `
- `x-fluxis-api-key: `
::::warning
Treat your API Secret as a sensitive credential. Never expose it in client-side code, browsers, or mobile apps.
::::
---
## Step 1 — Credential provisioning
Before making any API calls, create API credentials in the Fluxis Dashboard.
::::info
New to Fluxis? Complete [Merchant Sign Up](/docs/merchant-integration/sign-up) (account creation + 2FA) before this step.
::::
### Create an API key in the dashboard
1. Sign in to the Fluxis Dashboard ([staging](https://dashboard.stgfluxis.us) or [production](https://dashboard.fluxis.us)).
2. Open **Developers → API Keys** (or navigate to `/app/api-keys`).
3. Click **Create** (or equivalent) to add a new key.
4. Assign **`read`** and **`write`** roles so you can list resources and create payment requests.
5. Complete the **2FA challenge** when prompted ([Two-Factor Authentication](/docs/developers/two-factor-auth) must be enrolled first).
6. Copy the **API Secret** immediately—it is shown **once** and cannot be retrieved later.
You will receive:
- **API Key ID** (e.g. `fxs.stg.` for staging, `fxs.prd.` for production)
- **API Secret** — store in a secrets manager or environment variables
See [API Credentials](/docs/developers/api-credentials) for roles, IP allowlisting, and lifecycle.
::::tip
If you operate multiple brands or regions, coordinate with Fluxis early to align your **Accounts** and **Points of Sale** structure. This will simplify reporting and reconciliation.
::::
---
## Step 2 — Authentication
Exchange your credentials for an access token that must be included in all subsequent API requests.
**Endpoint:** `POST /v1/auth/token`
See the full request/response format in our [API Reference - Authentication](/api/authentication#authenticate-and-get-access-token).
### Token usage
Include the access token in all protected requests:
```
Authorization: Bearer
x-fluxis-api-key:
```
### Token lifecycle
- **Expiration**: Access tokens expire (check the `expired_at` field in the response)
- **Renewal**: Implement a mechanism to refresh the token before it expires
- **Rotation**: Rotate your API Key/Secret immediately if you suspect they have been compromised
---
## Step 3 — Resource discovery
After authentication, retrieve information about your default accounts and default points of sale, or you can create new ones.
### 3.1 Retrieve accounts
Accounts represent your merchant's financial accounts within Fluxis.
**Endpoint:** `GET /v1/account`
See the full response format in our [API Reference - Accounts](/api/accounts#list-accounts).
### 3.2 Retrieve points of sale
Points of Sale (POS) represent your payment entry points — physical or virtual locations where you accept payments. You'll need the POS ID when creating payment requests.
**Endpoint:** `GET /v1/pos?page=1&page_size=20`
Required query parameters: `page` (≥ 1) and `page_size` (1–100). Organization keys may filter with `account_id`.
See the full response format in our [API Reference — Point of Sale](/api/point-of-sale#get-all-point-of-sales).
::::tip
Learn more about the POS concept: [Point of Sale](/docs/key-concepts/point-of-sale).
::::
---
## Step 4 — Settlement configuration
Before accepting payments, you need to configure where collected crypto assets will be delivered.
All assets collected from a specific network (e.g., USDT, USDC, or any other tokens on Polygon) will be delivered to the settlement address configured for that network.
::::note
For security reasons, settlement address configuration is currently handled manually by the Fluxis team. Contact your Fluxis representative to set up your settlement addresses for both staging and production environments.
::::
---
## Step 5 — Payment request creation
Create a payment request for each customer checkout attempt. The response includes a **NASPIP token** containing all payment information.
**Endpoint:** `POST /v1/pos/:posID/payment-request`
Key fields:
- `amount` — The payment amount (e.g., `"49.99"`)
- `unique_asset_id` — The target asset/network ([learn about UAIs](/docs/key-concepts/uai))
- `reference_id` — Your internal order ID for reconciliation
- `order` — Optional structured order data for receipts/UX
See the full request/response format in our [API Reference - Payment Request](/api/point-of-sale#create-point-of-sale-payment-request).
### 5.1 Displaying the NASPIP token
The `token` returned in the response is a NASPIP token that you present to the customer.
**Desktop checkout:**
Display the NASPIP token as a QR code for users to scan with their wallet app.
**Mobile checkout:**
Display a "Pay with [wallet app name]" button that opens the wallet app via deep link:
```
[wallet app deeplink url]?&naspip_token=
```
::::tip
Learn more about NASPIP: [NASPIP Token](/docs/key-concepts/naspip/introduction).
For a maintained list of wallet apps, deep link templates, and logos, see [Compatible Apps Registry](/docs/developers/compatible-apps).
::::
### 5.2 Hosted checkout (optional)
For a Fluxis-hosted payment page instead of embedding the NASPIP token yourself:
**Endpoint:** `POST /v1/pos/:posID/payment-request-checkout`
The response includes a `token` and `checkout_url` — a NASPIP-resolvable URL (same value embedded in the token) for backend-only or wallet-app consumption, not a browser page. For a Fluxis-hosted payment page, use the `hosted_checkout_url` field instead — a link to the hosted checkout page (`https://checkout.fluxis.us/checkout/:id`). Redirect the customer's browser there directly; it polls `GET /public/checkout/:sessionId` (no authentication required — the session ID is the access control, the same model Stripe and MercadoPago use) to render live payment status. When the session completes, the hosted page redirects to `return_url`: for a generic point of sale that is `config.return_url` on the POS; for a Tiendanube session it is the per-attempt callback for the terminal outcome (`success`, `failure`, or `cancel`) stored at Process Payment, not the POS return URL.
If the point of sale (or a payment link tied to it) has more than one configured payment option, the hosted checkout page shows an asset picker before a vault is assigned; the shopper's choice is submitted via `POST /public/checkout/:sessionId/select-asset`.
Payment links reach the same hosted checkout page through their own endpoints, without the merchant backend calling `payment-request-checkout` at all: `GET /public/payment-links/:code/checkout` returns the link's public data, and `POST` to the same path opens a checkout session. Both return a `checkout_session` object in the shape described above, so the hosted page renders a payment link exactly like a point-of-sale session. These endpoints keep the checkout session in a cookie (`credentials: "include"` is required), which is what stops a page reload or status poll from creating a duplicate payment request; the shopper's asset choice is submitted with `PUT` to the same path rather than `select-asset`.
See [API Reference — Create payment request checkout](/api/point-of-sale#create-payment-request-checkout).
---
## Step 6 — Choose how to monitor payments
After creating a payment request, you need to know when the customer pays. Pick **one or both** of the following strategies:
| Strategy | Delivery | Best for | Requirements |
| ----------------------- | ---------------------------------- | ----------------------------------------- | ------------------------------------------------------------------------------------------------ |
| **Webhooks (Option A)** | Push — Fluxis POSTs to your server | Production integrations, real-time UX | Public HTTPS endpoint, [signature verification](/docs/developers/webhook-signature-verification) |
| **Polling (Option B)** | Pull — your server queries Fluxis | Simple backends, local dev, no public URL | Valid Bearer token + API key; poll every ~3 seconds |
::::tip
Many teams use **webhooks as primary** and **polling as fallback** when a webhook is missed or your endpoint was temporarily down.
::::
### Option A — Webhook notifications
Webhooks are the recommended way to receive real-time payment status updates.
#### A.1 Configure your webhook endpoint
First, ensure you have a publicly accessible HTTPS endpoint ready to receive POST requests from Fluxis.
Then register a webhook on the **account** linked to your POS (use the `account_id` from your POS or account list):
**Endpoint:** `POST /v1/account/{accountID}/webhook`
```json
{
"url": "https://your-server.com/webhooks/fluxis",
"event_type": "payment_request"
}
```
Fluxis returns a `secret` **once** on create — store it securely for [signature verification](/docs/developers/webhook-signature-verification).
See [API Reference — Create webhook](/api/webhooks#create-webhook).
#### A.2 Webhook events
Fluxis sends `payment_request` webhooks when status becomes:
| Status | Description | Webhook delivered |
| ------------ | --------------------------------------------------- | ------------------- |
| `processing` | Payment detected, awaiting blockchain confirmations | Yes |
| `completed` | Payment confirmed — fulfill the order | Yes |
| `underpaid` | Customer sent less than the requested amount | Yes |
| `overpaid` | Customer sent more than the requested amount | Yes |
| `expired` | No payment in time | No — poll instead |
| `failed` | Unexpected processing error | No — poll / support |
::::note
The `underpaid` and `overpaid` states are edge cases that may imply an improper configuration from the wallet app side, since NASPIP tokens already contain the expected amount.
For signature verification steps, see [Webhook Signature Verification](/docs/developers/webhook-signature-verification).
::::
#### A.3 Handling webhooks
When you receive a webhook notification:
1. **Verify authenticity** — Validate the HMAC signature over the full parsed body `{ "data": … }` using the secret from create — see [Webhook Signature Verification](/docs/developers/webhook-signature-verification)
2. **Process the status** — Update your internal order status and notify the customer
3. **Acknowledge receipt** — Return HTTP `200 OK` to confirm receipt
::::warning
Your endpoint must respond quickly (< 2 seconds). Queue any heavy processing for background execution. Failure to acknowledge may result in Fluxis re-sending the notification.
::::
#### A.4 Idempotency
You may receive duplicate webhook events. Ensure your handler is **idempotent** — processing the same event multiple times should produce the same result.
#### A.5 Test your handler
After registration, trigger a signed sample delivery:
**Endpoint:** `POST /v1/account/{accountID}/webhook/{webhookID}/test`
Fluxis POSTs a `payment_request_status_update` payload using the same signing path as production. Verify the signature in your handler and return HTTP `200`. See [Webhook Signature Verification](/docs/developers/webhook-signature-verification) for the canonical JSON rules and worked example.
You can also register webhooks from the dashboard under **Developers → Webhooks**. See [Webhooks](/docs/developers/webhooks) for API and dashboard options.
---
### Option B — Polling
If you do not have a public HTTPS endpoint—or prefer a simpler first integration—**poll** the payment request status on a fixed interval (for example, every **3 seconds**) until the status is terminal.
**Endpoint:** `GET /v1/pos/:posID/payment-request/:paymentRequestID`
Required headers: `Authorization: Bearer ` and `x-fluxis-api-key: `.
#### Recommended polling pattern
1. After creating a payment request, record `paymentRequestID` and `posID`.
2. Poll every **~3 seconds** while status is `created`, `pending`, `confirmed`, or `processing`.
3. **Stop polling** when status is terminal: `completed`, `expired`, `underpaid`, `overpaid`, or `failed`.
4. On `completed`, fulfill the order; on `expired`, offer to create a new request.
::::warning
Payment requests expire after about **8 minutes**. Avoid polling faster than once per second—3 seconds is a reasonable default for checkout UX.
::::
**Example (curl):**
```bash
curl "https://api.stgfluxis.us/v1/pos/${POS_ID}/payment-request/${PAYMENT_REQUEST_ID}" \
-H "Authorization: Bearer ${ACCESS_TOKEN}" \
-H "x-fluxis-api-key: ${API_KEY}"
```
**Example (Node.js loop):**
```javascript
const TERMINAL = new Set([
"completed",
"expired",
"underpaid",
"overpaid",
"failed",
]);
const POLL_MS = 3000;
async function waitForPayment(posId, paymentRequestId) {
while (true) {
const res = await fetch(
`${API_BASE}/v1/pos/${posId}/payment-request/${paymentRequestId}`,
{
headers: {
Authorization: `Bearer ${accessToken}`,
"x-fluxis-api-key": apiKey,
},
},
);
const { data } = await res.json();
if (TERMINAL.has(data.status)) return data;
await new Promise((r) => setTimeout(r, POLL_MS));
}
}
```
See the full response format in our [API Reference — Get payment request](/api/point-of-sale#get-payment-request).
::::note
`expired` and `failed` statuses do **not** trigger webhooks—polling (or manual checks) is required for those outcomes.
::::
---
## Step 7 — Reconciliation
Even with webhooks or polling at checkout time, run **periodic reconciliation** to ensure no payments were missed (downtime, network issues, or handler bugs).
### Query a specific payment request
If you didn't receive a webhook (or your system was down), fetch the payment request status directly:
**Endpoint:** `GET /v1/pos/:posID/payment-request/:paymentRequestID`
### List transactions for reconciliation
For batch reconciliation, query the transactions endpoint:
**Endpoint:** `GET /v1/transactions?page=1&page_size=50`
Required query parameters: `page` (≥ 1) and `page_size` (5–100).
Optional filters:
- `accountID` — Filter by account (organization-level API keys only)
The response is paginated: `{ data, total, page, page_size, total_pages }`.
::::tip
A common reconciliation pattern: periodically list `completed` transactions and match them against your internal orders by reference ID, amount, and timestamp.
::::
---
## Payment request lifecycle
Payment requests move through the following states:
| State | Description | Merchant action |
| ----------------------------------- | ---------------------------------------- | -------------------------------------------- |
| `pending` | Checkout created, currency not selected | Wait or display hosted checkout |
| `created` | Address assigned, awaiting payment | Display QR/link to customer |
| `confirmed` | Internal confirmation step | Usually no merchant action |
| `processing` | Payment detected, awaiting confirmations | Keep waiting — don't fulfill yet |
| `completed` | Payment confirmed | Fulfill the order |
| `expired` | No payment received in time | Offer customer to retry (create new request) |
| `underpaid` / `overpaid` / `failed` | Edge cases | Contact Fluxis support |
Learn more: [Payment Flows - Happy Path](/docs/payment-flows/std-flow) and [Payment Flows - Edge Cases](/docs/payment-flows/edge-cases).
---
## Go-live checklist
Before going to production, verify:
- [ ] You can obtain and refresh Bearer tokens via `POST /v1/auth/token`
- [ ] You can list your POS and select the correct `posID`
- [ ] Your checkout creates one payment request per attempt
- [ ] You display the NASPIP token correctly (QR code or deep link)
- [ ] You have a monitoring strategy: webhooks **and/or** polling (~3 s interval until terminal status)
- [ ] If using webhooks: registered via `POST /v1/account/{accountID}/webhook` with `event_type: payment_request`
- [ ] Webhook `secret` stored from create response and used for [signature verification](/docs/developers/webhook-signature-verification)
- [ ] Test delivery via `POST /v1/account/{accountID}/webhook/{webhookID}/test` verifies and returns HTTP 200
- [ ] Your webhook endpoint is publicly accessible and responds with HTTP 200
- [ ] Your webhook handler is idempotent
- [ ] If using polling: `GET /v1/pos/:posID/payment-request/:paymentRequestID` stops on terminal status
- [ ] You have a periodic reconciliation process (`GET /v1/transactions`)
---
## Need help?
If you have questions about onboarding, credentials, or production readiness, contact us at [support@fluxis.us](mailto:support@fluxis.us).